Titan10 Plus Manual
Before Riding Manual
This manual contains important information to help you use your product more safely. For safety concerns, "Danger", "Warning" and "Caution" are marked depending on the degree of risk. Definitions are specified as below.
Danger:
Indicates a hazardous situation that could result in serious injury or death.
Warning:
Indicates a potentially hazardous situation that could result in serious injury.
Caution:
Indicates a potentially hazardous situation that could result in minor injury or property damage.
Table of Contents
- Safety Guidelines and Restrictions
- Precaution Before Riding
- Name of Each Part
- How to Use the Product
- Display / Switch Instructions
- RGB Lights Introduction
- How to Use the Charger Correctly
- Safety Precautions for Lithium-ion Battery
- Safety Guidelines Before Riding
- Maintenance
- Product Specifications
- Programming Codes
- Error Codes
Safety Guidelines and Restrictions
-
Be careful of water!
This product and its components are not waterproof. Don't let water get into the product and its components.
*Never use the scooter if the road is wet due to rain, snow, or hail.
*Avoid washing or exposing electric components to water, as this can cause malfunction or fire. -
Beware of folding and spinning parts!
If body parts, such as fingers or hair, get caught in the folding or spinning parts, it may lead to severe injuries. Please be careful. -
No acrobatics
Stunts such as jumping and dropping on the scooter are prohibited as these actions can cause significant impact on the product, leading to malfunction and accidents. -
No companion boarding
This product is designed for use by one adult only. Children, infants, or additional passengers are prohibited. -
Do not tune it by yourself
Disassembling electric parts or making modifications on your own is not recommended unless done under professional guidance or for necessary repairs and parts replacement. -
Comply with related laws
Drunk driving is prohibited. Loading cargo on the scooter is not suggested. Additionally, please comply with the Road Traffic Act and other local laws and regulations applicable in the area where the scooter is used. -
Beginners and juniors are encouraged to ride at low speed
Beginners who are not yet accustomed to using the product should avoid high-speed mode and instead use low-speed riding. Additionally, practice riding in a safe, open area before using the scooter in more challenging conditions. -
Do not sudden brake with front brake
Avoid sudden deceleration that could risk overturning. Do not use unusual methods or artificial forces, such as stopping with your feet. -
Do not accelerate when going downhill
Slow down when going downhill. Use the brakes properly to manage your speed and reduce heat on the disc. -
Do not ride on steep slopes
Acceptable gradeability varies for each product. Excessive gradients beyond the scooter's hill-climbing capability may cause damage to the product or its parts due to temperature cut, overcurrent, or low voltage cut, which can lead to malfunction. -
Safety warning when lifting the product
If the product is lifted by holding only the handle, there is a risk of damaging the product due to deformation of the folding parts caused by the load or movement. When lifting the product, be sure to hold the body (deck) with one hand and the handle with the other to avoid injury to your back or knees. -
Be sure to wear safety equipment
For rider safety, always wear a full-face helmet and other protective gear (knee, elbow, hand pads, upper body protection). Avoid wearing inappropriate footwear, such as slippers or high heels.
Precaution Before Riding
-
Record Your E-Scooter Serial Number: To ensure smooth after-sales support, please make sure to record your e-scooter's serial number and take a photo or keep a record of it. The serial number acts as your e-scooter's "ID" and will be required for any warranty or service-related issues.
Additionally, if your e-scooter is lost or stolen, having the serial number is crucial for reporting the incident and retrieving the product. - Avoid night riding. Always wear a helmet and other protective gear (knee, elbow, hand pads, upper body protection, etc.) and ride safely.
- Select the appropriate mode for your riding conditions. To better handle unexpected situations on the road, hold the handlebar with two or three fingers on the brake lever, so you can quickly apply the brakes if needed.
- When turning left or right, slow down to avoid the risk of overturning or slipping.
- For safety, if you need to go backward, dismount the scooter after coming to a complete stop and then move the scooter manually.
- Avoid using the scooter in slippery areas, crowded places, steep slopes, roads with high accident risk, and uneven surfaces.
- When crossing pedestrian crossings, dismount the scooter to ensure pedestrian safety.
- Do not ride in high-risk areas and be aware of bicycles, motorcycles, cars, and pedestrians around you on the road.
- Slow down when passing over speed bumps and obstacles.
- When decelerating or braking, do not stop with your foot. Use the brakes appropriately instead.
- Be cautious of the risk of burns due to heat from the motor and brake (especially the disc) after riding.
- Do not ride with one hand on the handlebar.
- Do not ride when the kickstand is down.
Name of Each Part

How to Use the Product
-
Product Unfolding
Please watch this video first to assemble the folding parts
Step 1: Hold and lift the stem.
Step 2: Pull the black safety lock on the side outward, then stand the stem upright.
Step 3: Push the folding buckle in front of the stem to secure it. You will hear a "click," indicating that the stem is securely locked and the unfolding process is complete. -
Assembling T-bar
Step 1: Loosen the screws on the handle stem using the tool.
Step 2: Place the T-bar onto the handle stem, ensuring it is centered.
Step 3: Tighten the 4 screws back onto the handle stem using the tool. -
Assembling the Display and Brake Lever
First, adjust the positions of the brake lever and display. Then, use a 5mm hexagon wrench to tighten the fixing bolts.
-
Product Folding
Step 1: Push the small folding mechanism upward and pull the folding buckle outward.
Step 2: Pull the black safety lock on the side outward, then fold the stem down.
- How to Start

- Turn on the scooter
- Press the power button on the display for 3 seconds to turn on the scooter.
- Place the card on the NFC reader for 2 seconds. You will hear two beeps, and the voltmeter will display the voltage bar.
*The display will turn off automatically after a few minutes of inactivity.
- Turn off the scooter
- Place the card on the NFC reader for 2 seconds. You will hear one beep, and the display will turn off.
- Stance for riding
After tilting the kickstand, find a stable position on the footrest and hold the handle grips comfortably. Avoid placing your foot on the rear fender.
*Scooters are generally set to “zero start” at the factory, so you will need to kick the ground to start riding. - Acceleration
Acceleration can be performed by using the throttle of the display while riding, and the deceleration or stop can be performed by holding the brakes on the handle.
Caution !
Before riding, inspect the scooter to ensure all folding parts are securely locked and positioned correctly. Check the handlebar and fastenings for any looseness or damage. Ensure all bolts and components are tight and in proper condition.
Throttle malfunction caution
If the throttle malfunctions, the motor sensor may continue to operate even if the throttle is not being actively used. This can result in issues such as unexpected or sudden acceleration. If you experience this, immediately hold the brake lever to stop the scooter and prevent further acceleration. Possible causes for this malfunction include throttle corrosion, water immersion, magnet disconnection, broken levers, or a broken spring.
-
How to stop
Pull the brake lever gently; avoid braking suddenly. Gently applying the brake will activate the EABS (Electronic Anti-lock Braking System) function, which helps reduce speed effectively. As the speed decreases, the brakes will eventually bring the scooter to a stop.
Tip: Ensure safe braking
* For safe braking, check whether the brake lever and drum brake connection are damaged before and after riding (wire damage, external breakage, etc). Also, check if the brake is worn and whether the inner core (inner wire) of the brake is loose.
* Due to various factors such as road surface conditions and speed, the brake might not stop the scooter as expected. The EABS function is an auxiliary function to further increase the braking force. Users should understand the EABS system and be able to estimate the stopping distance and braking time while riding.
Display / Switch Instructions

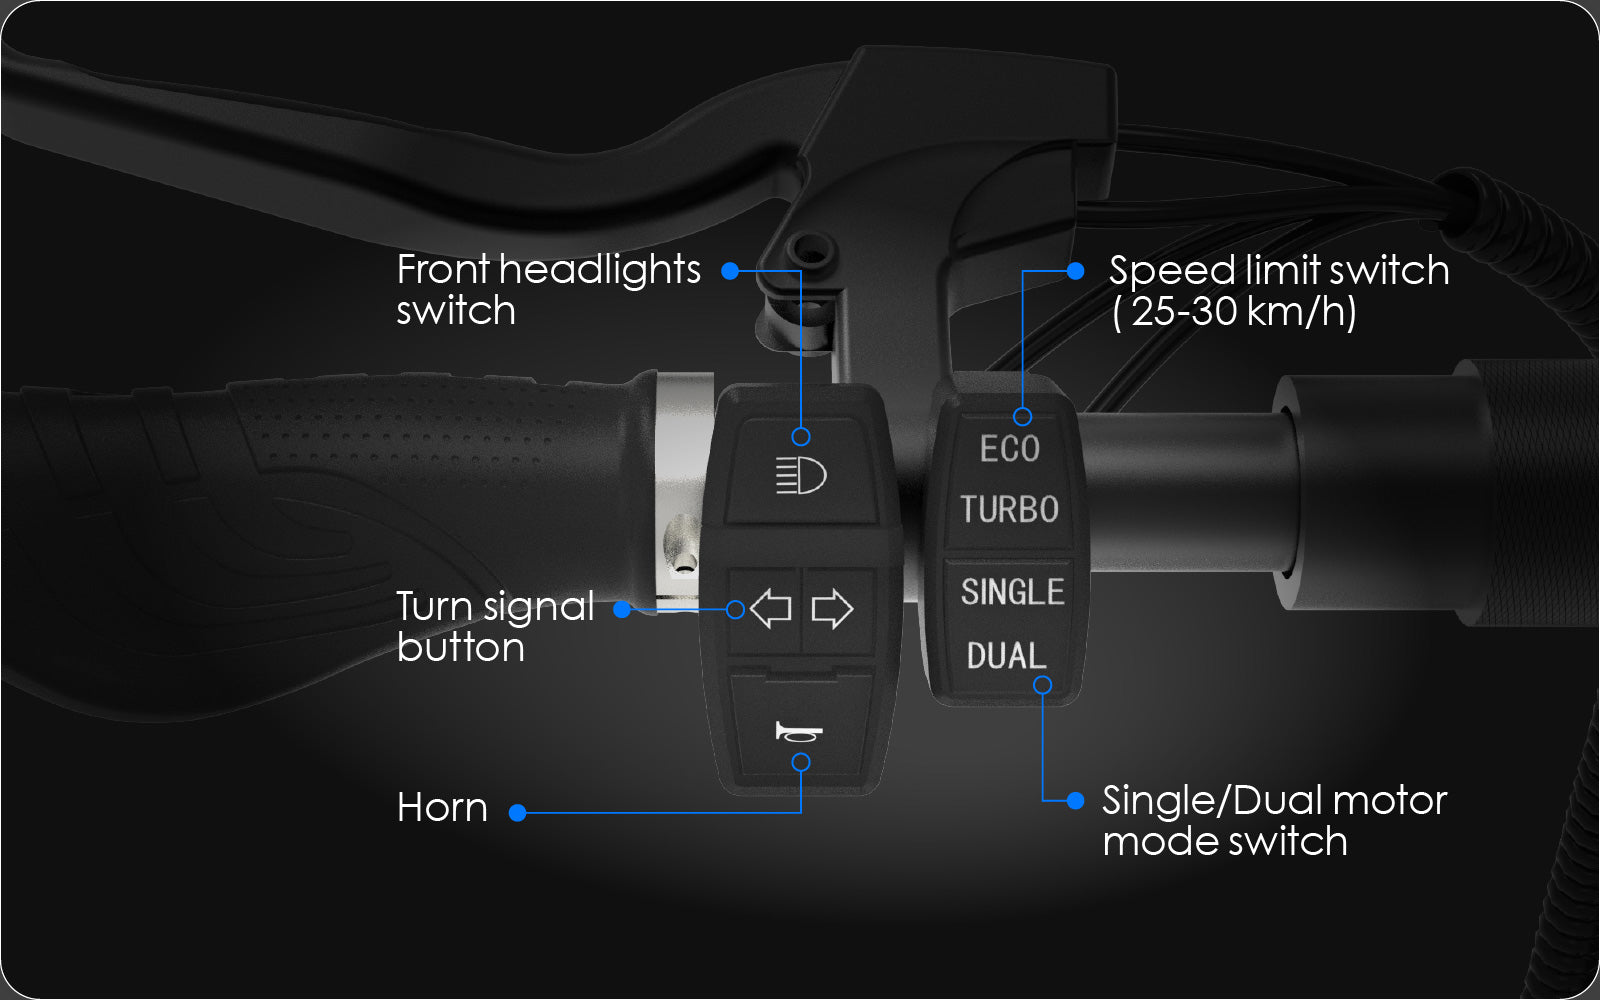
- Turn on/off the scooter: To turn on the scooter, first long-press the power button for about 3 seconds, then use the NFC card. To turn off the scooter, simply use the NFC card.
- Light on/off: Long-press the mode button for about 3 seconds.
- Switch speed gear: Short-press the mode button to change the speed gear (1, 2, 3).
- Mode function: Short-press the power button to cycle through modes: TIME > TRIP > ODO > VOL.
TIME: Ride time for a single ride / TRIP: Mileage for a single ride / ODO: Scooter’s total mileage / VOL: Battery voltage - P setting: Long-press both buttons together to enter the P settings.
- Display Error Symbols
 -Brake sensor error: Brake sensor is triggered. Check if the brake levers and cables are stuck or if the sensors are faulty.
 -Controller fault: Internal controller appears to be faulty. Check if it is damaged by water, or burnt. The controller may need to be replaced.
 -Motor fault: Issues with the motor. Check if the motor cables are intact. The motor may need to be replaced.
 -Throttle fault: Check the internal spring and magnet sensor of the throttle display. You will need to open the back cover of the throttle display to troubleshoot.
 - ECO/TURBO button: Press to switch between ECO and TURBO modes. In ECO mode, the maximum speed is limited to around 25 km/h.
- SINGLE/DUAL button: Upon startup, the scooter defaults to single motor mode. Press the button to activate dual motor mode.
* The switch design may vary, but the functionality remains consistent. - Headlight: Press to turn on.
- Turn signal: Press to activate. Press again to cancel. Refer to the light instructions for further details.
- Electric Horn: Press to activate.
Caution !
If malfunctions or defects occur, please contact the SPLACH customer support team for assistance. Do not attempt to repair the scooter yourself.
RGB Lights Introduction
The RGB lights are installed on the stem pole and the sides of the body deck. To control these lights, follow these steps:
- Scan the QR code and download the App.
*NOTE: iOS devices require version 10.0 or higher, while Android devices need version 4.4 or higher. You can also find the app by searching for "BanlanX" in the App Store or Google Play.

- App Operations:

- Open the App and click the "+" icon in the upper right corner of the homepage, then select "Add device." Note: Note: Ensure that the e-scooter’s lights are turned on and that your phone's Bluetooth is enabled for pairing. Once paired, select the device you want to control from the device list to access its control page.
- User can modify the device name and calibrate the RGB color settings by clicking the "…" in the upper right corner of the operation page.
- User can set up to five timing events clicking the "alarm clock icon" in the upper right corner, please note that all set timing events will be deleted when the controller is powered off.
- On the effects page, you can choose from various music and non-music effects, and adjust settings such as speed, brightness, color, and effect length for each specific effect.
- For more detailed information and help, click the button in the top right corner.
- IR Remote Functions:

- Button Functions:
On/Off button: Turns the LED light on or off.
Mode button (M): Switches between different effects.
Speed button (S): Adjusts the speed of non-music effects.
How to Use the Charger Correctly

- Basic charging method
- Step1: Open the charging port cap and connect it to the connector of the charger and connect it to the household outlet.
- Step2: Charging status indicator: (Red) Charging; (Green) Charging complete.
- Step3: Always close the charging port cap when riding or storing the product, except during charging.
- Step4: When connecting the charger, sparks may occur due to voltage differences. This is normal and not a cause for concern.
- Basic charging method
Failure of the charger and abnormal conditions can cause electric shock and other hazards. Learn the correct usage and take preventive measures to avoid accidents.
- Manufacturers and sellers are not responsible for any problems arising from disassembly, modification, or the use of non-genuine chargers.
- Do not use the charger in high-humidity environments, near heat sources, flammable materials, confined spaces, or areas without ventilation, such as inside a car.
- The charger is not waterproof. It should be stored and used carefully to prevent moisture from entering.
- Keep children and pets away from the charger to avoid the risk of electric shock.
- If the charger indicator does not light up, if the charger has fallen, if it has been subjected to strong external shocks, or if the cable cover is damaged, discontinue use immediately.
- Unplug the charger when you are away from home for long periods of time.
- Use only genuine charger.
- Do not insert conductors into the charging port.
- Do not touch the plug for about 10 seconds after unplugging the charger. There is a risk of electric shock from instantaneous discharge.
- Do not remove the charging terminal during charging, as it may cause a malfunction of the charger’s internal circuit.
- Do not operate the product while it is charging.
- Charging terminals should be firmly contacted during charging and should not be used if they are corroded or damaged.
- When disconnecting the charger from the product, hold the terminal rather than the wire.
Safety Precautions for Lithium-ion Battery
-
Care
Protect lithium batteries from direct exposure to children and pets. -
Performance
① Lithium battery performance can be affected by external temperatures. In winter, low temperatures can temporarily reduce battery performance, decreasing both mileage and power output.
② Lithium batteries typically experience a reduction in discharge performance of more than 15% after 300 or more charge/discharge cycles. If you notice a significant decrease in usage time due to extended use, consider replacing the battery with a new, genuine one. -
Charging
① Use only the genuine battery and charger supplied by the manufacturer. Issues caused by using non-manufacturer batteries or chargers are not covered by the manufacturer.
② Charging the lithium battery with a non-genuine charger may lead to malfunctions or fire hazards.
③ Charge the lithium battery in a well-ventilated, dry area, away from any flammable materials.
④ The lithium battery should be charged within the temperature range of 0-45°C and discharged within -10-60°C. Charging or discharging outside these temperature ranges may cause malfunctions, fire, or explosion.
⑤ If moving the battery from a cold environment to a warmer one, wait 1-2 hours before charging. This precaution helps prevent condensation inside the product due to temperature differences. -
Storage
① Keep lithium batteries away from snow, rain, and direct sunlight. Do not store or charge them in a trunk or high-temperature environment. Choose a dry location and store the batteries at room temperature (10-20°C).
② If storing the battery for more than 3 months, charge it to 70-80% of its capacity before storage. Avoid storing the battery at full charge. Check and recharge the battery every 1-2 months to prevent damage from low charge. Note that damage resulting from extended inactivity is not covered by the warranty. -
Trouble symptoms and safety
① If the lithium battery shows signs of damage, leakage, sour odor, or deformation, discontinue use immediately. Contact the place of purchase for technical support and service.
② If overheating, smoke, or ignition occurs, stop charging and using the product immediately. Move the product outdoors as soon as possible and use a fire extinguisher to extinguish any flames. Do not use water or immerse the product in water, as this can be dangerous.
③ Lithium battery packs have high energy density. Prolonged or unattended charging can lead to short-circuiting, leakage, or damage, and may result in ignition. Avoid charging the battery for extended periods without supervision, and ensure that charging is performed with awareness of potential fire risks. -
Misuse
If the lithium battery experiences a short circuit, polarity reversal, or physical impact, it may malfunction or cause a fire. If you suspect any of these issues, immediately stop charging and using the battery. -
Water inflow
Prevent water from entering the lithium battery. Connecting the charger while moisture is present poses a risk of fire or electric shock. -
Caution
If the battery is disconnected from the main unit, do not attempt to recharge, reinstall, or use it in any other applications. -
Disposal
It is recommended to have a professional handle the removal of the battery from the product to prevent short-circuit incidents. Dispose of the battery as industrial waste.
Danger !
Battery disassembly is prohibited. Disassembly, modification, or repair of the battery is not covered under warranty.
Safety Guidelines Before Riding
Required checks before use
-
Check throttle and handle
*Operate the accelerator throttle lever about 2-3 times to check whether it returns to the original position.
*Check the fastening condition and clearance of the QR lever on the handle. -
Check brakes and cables
*Press the brake levers to check whether the brakes are operating normally. If braking force is significantly reduced, inspect the system before use.
*Check that the brake pads are not worn, and ensure cables are neither loose nor damaged.
*If you notice any unusual sensations or noises during operation, inspect the brake cables for breakage, wear, and deformation of the inner wires.
*Check that the bolts and nuts of the brake fixing parts are not loose. -
Check tire pressure and uniaxial condition
*Inspect the front and rear tires for wear or punctures.
*Determine the appropriate timing for replacement by observing the condition of the tires, such as damage or uneven wear. -
Tightening check for folding parts and handle parts
Make sure that the bolts and nuts of all parts of the product are tight and free from loosening. Check the fastening condition and clearance of the folding and fixing parts of the handle.
Danger ! In this case, stop riding immediately.
If you encounter any of the following situations while riding, stop immediately and contact your nearest branch or service center for appropriate measures. Providing pictures and videos can help in obtaining an accurate diagnosis and professional advice.
*Unusual heating of the motor
*Brake malfunction or error
*Error messages on the dashboard
*Throttle not returning to its original position
*Abnormal noises
*Smoke, ignition, or sour odor from the product
*Exposure to rain or water
*Any other unreasonable riding conditions
Maintenance
-
Maintenance and self-maintenance
Electric products can be damaged by various factors. The lifespan of each component varies depending on riding habits and environmental conditions. Parts that have exceeded their service life may result in accidents. Always be attentive to the condition of various parts to prevent safety issues.
- Check the replacement timing of consumable parts
① Components such as the suspension, tires, tubes, wheels, bearings, headset bearings, discs, brake pads, cables, folding parts, various brackets, and other consumable parts require regular inspections. - External force damage inspection
① Replace parts that may be damaged by external forces, such as deformed parts, cracks from compression, or wear and tear from overuse.
② Prolonged exposure to strong sunlight may cause discoloration.
③ If the scooter is heavily used, such as traveling thousands of kilometers and frequently encountering bumps, regularly inspect the scooter before use and replace parts based on the provided instructions/guidelines to ensure safety.
④ Fatigue breakdown and maintenance needs may vary based on riding environment and operating conditions. Therefore, it is also important to check parts beyond their replacement cycle for any signs of abnormality.
Important notice
① Please be aware that after operation, the motor and brake components (especially the disc rotor) may become very hot and pose a risk of burns.
② Ensure that the bolts on the motor, rim, and motor shaft are checked regularly, as they may become loose.
-
Brake adjustment method
As you continue to use the brakes, the brake pads will wear out, causing the gap between the pads and the rim to widen. If you notice a decrease in braking power, have the brake pads replaced or the brake system adjusted as needed.

Product Specifications
| SPLACH E-scooter | Titan Plus |
| Max Speed | Around 37 mph ( 59 km/h ) |
| Rated Power | 1,000W×2 |
| Max Power | 1,300W×2 |
| 0-30 mph Acceleration | 3.9 S |
| Max Climb | Around 35% |
| Motor | Brushless Motor×2 |
| Max Range | Around 44 miles ( 70 km ) |
| Lithium Battery | 52V 20.8Ah |
| Net Weight | Around 76 lbs ( 34.5 kg ) |
| Charge Time | Double Charging 5-6 Hours |
| Frame Material | 6061-T6 Aviation Grade Aluminum |
| Brake | Front and Rear Hydraulic brake + EABS |
| Display | LCD Intelligent Display + NFC Device |
| Lights | LED Security Lighting |
| Ambient Light | on the right & left sides as well as the stem |
| Brake Light | YES |
| Turn Signal | YES |
| Intelligent Temperature Control System | YES |
| Riding Modes | Turbo / Eco button × Single / Dual motor selection × 3 gear modes on the display = 12 different speed modes to choose from to suit your demand. |
| Tire Type | 10x3.0 inch pneumatic off-road tires |
| Suspension | Front and rear suspension |
| Foldable | YES |
| Headlight | YES |
| Bell | YES |
| IP rating | IP54 |
| Available Colors | Steel Blue |
| Smart Cruise Mode | YES |
| Load Limit | 265 lbs ( 120kg ) |
| Unfolding Size | 4.33L x 2.20W x 4.27H ft (1320L x 670W x 1300H mm) |
| Folding Size | 4.33L x 0.72W x 1.94H ft (1320L x 220W x 590H mm) |
Remarks:
*The specification can be changed by manufacturer without notice to improve the quality and safety for users.
*The distance can be affected by loaded weight, wind direct (wind speed), road condition, slope and tire condition.
Programming Codes
| Codes | Setting | Content |
| P00 | Wheel Diameter | 10 inches |
| P01 | Under Voltage Value | 42.5V |
| P02 | Motor Magnet | 30 |
| P03 | Gear Mode |
0: 3rd gear / 1: 5th gear / 2: 9th gear There are a total of 9 gears. Setting 0 allows for 1 to 3 gears; setting 1 allows for 1 to 5 gears; setting 2 allows for 1 to 9 gears. |
| P04 | Speed Unit | 0: KM / 1:Mile |
| P05 | Start Mode | 0: Zero start / 1: Kick start |
| P06 | Cruise Control | 0: Cruise off / 1: Cruise on |
| P07 | Drive Mode | N/A (This setting is configurable but currently has no effect) |
| P08 | Speed Limit Percentage | 0-100 |
| P09 | EABS Strength | 0-5 |
| P10 | Power-on Password | Default setting: 8888 |
| P11 | Set Password | N/A (This setting is configurable but currently has no effect) |
| P12 | Motor Sensor Setting | N/A (This setting is configurable but currently has no effect) |
| P13 | Soft and Hard Start | 0-5 |
| P14 | Speed Limit Percentage | N/A (This setting is configurable but currently has no effect) |
| P15 | Instrument Sleep Time | 1-10 |
| P16 | List of Single Mileage | 1: Save single mileage / 0: Do not save single mileage |
| P17 | Screen Brightness | 1-3 |
Error Codes
| Fault Code | Fault Condition |
| E-21 | Current Fault |
| E-22 | Twist Handle Fault |
| E-23 | Motot Fault |
| E-24 | Motor Hall Fault |
| E-25 | Brake Handle Fault |
| E-26 | Undervoltage Fault |
| E-30 | Communication Fault |